VistaMizer 4.1.0.0

Transform Windows XP on Windows Vista using VistaMizer. Having the graphic interface of Vista on your obsolete OS is possible if you download VistaMizer

Author      : M. Hoefs
O.S.         :WindowsWindows
License     : Freeware
Languages  :English
Date          :03/04/11 (Updated)
Last rev.    : 02/17/12
File size     :18.9 MB

 Download VistaMizer
Download VistaMizer


The Window Vista design on your XP.

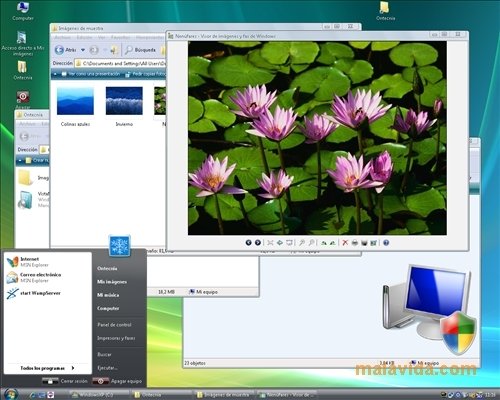
VistaMizer places the Windows Vista desktop on top of that of Windows XP. Thanks to this complete pack, managing to make the design of the menus, buttons and other objects of your Windows operating system to look like those of Windows Vista (very similar to those of Windows 7) is very simple.

  This Windows Vista theme for Windows XP works in a very simple fashion, you will only have to install it, restart it and see how your system has changed. Where you used to have blue bars with red buttons you will now find the polished interface that was launched with Vista.

  Having the Windows Vista Standard (just like Aero but without animations nor advanced graphic effects) design on Windows XP provides a quality sensation that is a lot higher in all the system, something that has a direct effect on how it is used. To manage this, VistaMizer modifies various system files like DLLs, screensavers, icons, wallpapers, mouse cursors,... The truth is that it will look like you are working with Windows Vista instead of XP.

  Thus, now you know, if you use XP because Vista doesn't work on your PC or because you simply like how XP works, you may want to install VistaMizer and manage to get a modern and functional interface.

  Requirements: This download only works on Windows XP.

Images

Images VistaMizer 4.1.0.0


Hummer HX Concept

Ini salah satu Mobil mewah menurut saya... meskipun tidak punya mobil.
Bagaimana ga mewah dari bentuk dan accessories didalam mobil mewah banget. Mungkin harga Murah bagi yang bisa beli...!!!!


Counter Strike : Global Offensive

Kumpulan Software Gratis
Counter-Strike: Global Offensive began as a port of Counter-Strike: Source to the Xbox 360 by Hidden Path Entertainment. Valve saw the opportunity and decided to expand the game since Counter-Strike was their least updated franchise at the time.
Jess Cliffe confirmed the name on the official Steam forums on August 11, 2011,[3] while Valve confirmed it in an official announcement on August 12, 2011.
Screenshot :
Kumpulan Software Gratis

Kumpulan Software Gratis

Kumpulan Software Gratis

Counter-Strike: Global Offensive is designed on the latest version of the Source engine, and is not built off Counter-Strike: Source. Valve is developing the game to be both casual and competitive, and is including a matchmaking system as well as support for dedicated servers.

Valve announced that the beta would begin in October, but they later delayed it due to feedback from VIP players. The closed beta started on November 30, 2011. It is currently available to people who have beta keys and will be continually expanded, with everybody eventually being able to play.

System requirements :
  • Operating System: Microsoft - Windows 7 / Vista / XP
  • Processor: Pentium 4 3 GHz or dual core from Intel 2 GHz or AMD64X2 (or better)
  • Memory: 1 GB for XP / 2GB for Vista
  • Video: At least 128 MB VRAM compatible with DirectX 9.0 and the technology to support Pixel Shader 2.0b (ATI Radeon X800 or better / NVIDIA GeForce 7600 or better / Intel HD Graphics 2000 or better).
  • Sound device: compatible with DirectX - 9.0c
  • Hard disk: 3 GB

Cara Menambah Gadget diatas Header

Pada umumnya blog bawaan dari blogger tidak terdapat gadget yang berada diatas header. Tapi kita sering melihat web maupun blog yang meletakkan gadget diatas header, seperti iklan baris, baner, gambar, teks berjalan, animasi, atau apa saja sesuai selera atau kebutuhan blog. Lalu bagaimana cara menambah gadget diatas header ?.


Langkah - langkahnya berikut ini :
1. Login ke Blogger.
2. Klik Tata Letak/layout/rancangan.
3. Klik Edit HTML.
4. Lalu cari kode berikut :

<b:section class='header' id='header' maxwidgets='1' showaddelement='no'>
Catatan : 
Setiap template mempunyai kode yang berbeda-beda, cari saja yang mirip seperti kode diatas.

5. Ganti kode diatas dengan kode berikut ini :

<b:section class='header' id='header' preferred='yes'>

6. Klik Save Template
7. Klik Page Element -> 

Lihat perubahan yang terjadi, sudah terdapat penambahan add a gadget diatas header yang dapat anda isi sesuai kebutuhan blog anda.

Selamat mencoba dan Semoga bermanfaat.... dan cara ini saya coba ternyata berhasil. Kalau mau beri komentar ya silahkan saja ......, Terima kasih